Table of Content
However, mastering this skill isn’t enough; you need to maintain your layered hair’s healthy appearance by practicing a good hair care regimen. Keep your layers soft and smooth by using hair growth conditioners and apply some hair growth serums for more durable and longer locks. Finally, when you’re mentally preparing to cut layers in your short hair, always err on the side of cutting longer layers. Cutting layers in short hair requires a detailed plan to maximize your success. There’s little room for error, given that you’re already working with a short head of hair.
Trim 1 to 2 inches from the tips of the static guide and complete the entire haircut. If your hair is still too long, re-cut the static guide an additional 1 to 2 inches and continue with the rest of your hair. For the record, pros recommend seeing a stylist for a layered haircut. But if you simply cannot be stopped, this easy-to-follow tutorial will help you add long layers at home. Pay special attention to YouTuber Pick Up Limes’s technique for point-cutting . Slide cutting will give you a perfectly imperfect gradation to serve as a base for your face framing layers.
How do you cut the short layers on top of your head?
Determines the length of the static guide. Hold it between the middle and index fingers of your non-dominant hand. Slide your fingers toward the tips, pulling the strand upward to create a 180 ° angle. Once you reach the desired length, stop and cut the excess hair with sharp scissors. The key is to start small with a few careful snips — and to go slow.
With over seven years of professional hair styling experience, Jenny specializes in hair coloring, haircutting, and hair extensions. JT Hair Lab is an authorized carrier of R+Co and of Milbon and is committed to using products with quality ingredients. This article has been viewed 3,844,052 times. The ninety-degree angle extends the hair straight out from the head, producing a uniformly layered haircut. This article has been viewed 424,119 times. Saturated the hair with the warm mist—your hair should be damp, not dripping.
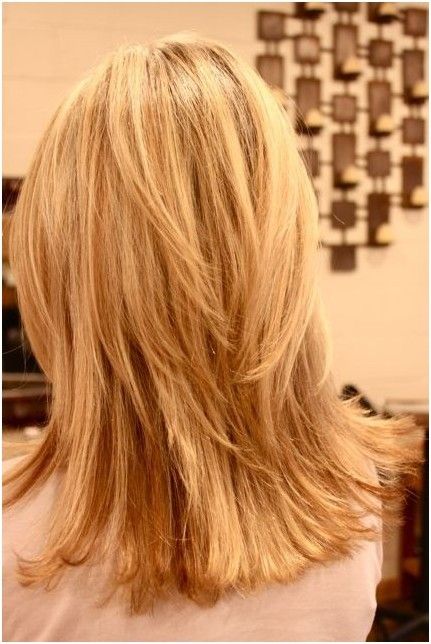
How to cut layers in long hair:
Using a sharp scissor, trim the excess hair. Throughout the cutting your own hair layers process, you will use 1 static guide to cut the rest of the strands. In this way, the result will be messy layers of different lengths throughout your hair. Detach a small strand of hair from the top of your head.

To trim your hair at home, start by sectioning your hair into at least four sections. “It helps you focus and will help you trim to the same length in each section,” says Brown. And if you have really long or thick hair, Brown says you can take it a step forward and divide each of those four sections in half too. And FWIW, I’m not just trying to be a bummer or crush your impulsive 11 p.m.
Step 2: Part your hair into sections. Never cut your hair carelessly.
Remove the elastic and examine your layers. You will have even, natural-looking layers around your head. Trim individual pieces if you want to alter your look. If you're trying to emulate the look of a certain celebrity or popular hairstyle, figure out how to make it work with your hair. Decide where the layers should fall, how your hair will be parted, and how you'll style it in the end. The freshly cut segment is now the travelling guide.

You can always take more hair off, but you can't add back what you've already chopped! If you're cutting your hair while it's wet, remember it will look even shorter once it dries, so snip with extreme caution. In fact, if your strands are curly or you're wavy-haired, only cut your hair when it's dry so you can get a better idea of what the final look will be. If you have straight hair, you can cut while it's wet or dampen it with a spray bottle first to get the cleanest, sharpest lines possible. Your facial shape also determines the fate of your layered haircut.
Section your hair
Trim off 1 to 2 inches of hair from the stationary guide and complete the entire hair cut. If the hair is still too long, take another 1 to 2 inches off of the stationary guide and re-cut your hair. Shampoo and condition the hair prior to cutting your locks. Grab a towel and squeeze the excess water from the tresses. Comb through your hair to remove all the snags and snarls.
This haircut tutorial was pretty much made for you. Follow along as YouTuber Vivi König very carefully gives her bangs some TLC. She recommends styling your hair prior to your trim—that way you have a better idea of the true length you’re working with. Committing to DIY bang trims—and this tutorial for straight hair is a great place to start. Kamara Brown Lewis is a hairstylist at Raw Intuition salon in Los Angeles who specializes in protective hairstyles, faux locs, and curl cuts. Brown also has her own wig line that offers wigs, bundles, and clip-ins, from yaki textures to 3b/4c textures.
To maintain a short pixie style, Kaye uses clippers, shears and lots of clips on her semi-relaxed hair. Parting hair evenly, clipping hair back tightly and carefully combing through hair is crucial for this precise cut. Comb your hair out and examine your layers. Once you've finished cutting, check all of the layers to make sure they fall where you want them to. Cross check your cut by examining the hair vertically and horizontally.
By point cutting directly into a single spot, we can achieve a little separation in our layers. Getting a perfectly even DIY cut can be tricky, but this tried-and-true method for achieving layers at home is great for beginners. Smooth hair into a ponytail at the top of the hairline near the forehead (hence the "unicorn ponytail" method), pull hair forward and snip ends. The sharper the angle, the more drastic the face-framing layers will be. This article was co-authored by Jenny Tran. Jenny Tran is a Hair Stylist and the Founder of JT Hair Lab by Jenny Tran based in the Dallas, Texas metro area.
Bring it down the side of your face and slide your fingers toward the tips of your hair until they are level with the place where the right side layer was cut. Use the scissors to trim the length of hair extending from your fingers. Bring it down the side of your face and slide your fingers toward the tips of your hair until they are level with the place where you want the side layers to be cut.

While cutting one side will always feel more natural, slide cutting prevents that other side from feeling extremely foreign and more prone to major mistakes. For this particular cut, I suggest a method called slide cutting. Slide cutting is a very gentle approach that enables flexibility and less room for error. By keeping your shears open and making delicate pulses—never fully closing your shears together - let your shears glide their way down the front of the hair. Remember you are not cutting into the hair at all. It's all about going straight down from your guide.
You will also need a cutting comb, cape, well-lit mirror, hair clips, and a blow dryer, which can all be found at your local beauty supplies store or online. Lift your hair with your fingers at a ninety-degree angle from your head. Hold it straight between your forefinger and middle finger.
I-want-new-hair-right-now dreams—I just want you to do what’s best for your hair, k? “A trim is definitely better if you go with a pro,” says hairstylist Kamara Brown Lewis. Plus, “if you mess up, you’ll end up needing a professional—and more than likely, you’ll have to go shorter than you initially wanted,” Thevenot says.


No comments:
Post a Comment